
Even after weeks of being published, our Monster Hunter World bow end-game guide is still going strong with reader engagement. Well, thanks to that, I’m back with another weapon and build end-game setup, and this time it’s for the lance! Check out our Monster Hunter World lance end-game build with tips and tactics now!
Note: this is a build I tested extensively which I’ve used to take down tempered Elder Dragons. This is not a definite “best” build since that depends on your play style. However, this will get you places, and will let you solo tempered Elder Dragons with relative ease.
Why the lance and how do I use it?
Let’s get this out of the way first: you don’t see a lot of lance users, right? Well, there’s a very good reason for that, and it’s because the lance (and in itself the loadouts) isn’t a flashy, super damage-dealing machine. Sure you can deal a ton of damage up close, but there’s no berserker combos like the dual blades or you won’t be the one counted on to do the most damage. However, what the lance lacks in flash, it more than makes up for in defense, security and being reliable — and boy, is the lance reliable!
Triple Poke Combo -The main attacks you’ll be doing with the lance are the “triple poke” combo, mixed in with the guard stab, and the running charge. For the most part, triangle, triangle, triangle or circle, circle, circle will be your best friends (you can mix any of the two in any order but it’ll be capped at three hits). Once you’re done with the three hits, either sidestep (by pressing X) to any side, or hold R2 + circle and then cancel the guard by pressing circle again, to be able to repeat the triple poke combo. This triple poke is your bread and butter move, so learn it, live it, and love it, lance user!
Lance Charge – Another move you need to learn is the lance charge, which will have your character run towards a specific direction, hitting anything in your path (yes, even allies). This consumes stamina (and dulls your weapon fast), so use it wisely. You can press X while running to jump which will sometimes let you mount a monster. Pressing square at the end will have you stab the enemy with Mind’s Eye activated (meaning your hits won’t bounce off), or press circle for a triple-hit stab. You can also use this move to chase down monsters, and did I mention how satisfying it is to see the damage numbers pile up when you skewer through large enemies?
Guard Advance – Holding R2 and pressing triangle and pushing the analog stick forward will do a guard mini dash. Pressing triangle again will make your character bash his shield, and pressing circle will translate to a stab. This is a great way to advance at monsters without sacrificing your defense,
Powerguard – Want to block anything — and I mean anything in the game? Then do the powerguard move. Just hit R2, circle and then X to drop your shield down, which will grant you 360-degrees of protection from any damage (yes, even tempered Elder Dragon ultimate attacks). Be careful though, since it can only protect you as long as you have enough stamina. However, if you follow the armor build below, you won’t even need to do this move.
Tips: the lance’s triple poke combo and your stabs are very accurate! You’ll be able to break horns, tails or whatever just by repeatedly attacking one specific area. The attacks might not look like much, but believe me, you’ll be severing tails, horns and more in no time.
You don’t have a “go-to” move when a monster’s down or incapacitated, which means you’ll either rely on your triple poke combo (rinse and repeat while they’re down), or lance charge at them which is less efficient. This might sound like a bummer, but the triple poke does enough damage to make it worth it.
There are more moves and subtleties to the lance’s moveset, but for the most part, the moves above will be what you’ll rely on the most.
Your main goal with this build is to tank everything, and then triple poke enemies into oblivion. Simple but it works.
End-game lance armor build:
- Headgear: Dragonking Eye Patch – Weakness Exploit Level 2
- Chest piece: Uragaan Mail a – Partbreaker 2
- Bracers: Teostra b – Weakness Exploit Level 1
- Coil: Uragaan b – Partbreaker 1
- Legs/Grieves: Uragaan a– Guard 2
- Attack Charm III – Increases attack power. Also improves affinity at higher levels
Note: Important here is the Urugaan Protection set bonus that lets you block unguardable attacks. This means that monster ultimate attacks (even from tempered Elder Dragons) are blockable!
End-game weapon:
Garon Dhara II
Note: Feel free to create elemental lances if you wish to counter each specific monster weak to it. The Bazelgeuse lance is also a top choice given its blast element. For the most part, the Garon Dhara II lance can be used against any enemy type given it’s super high affinity rating, and non-elemental damage.
End-game Decorations needed:
- Attack Jewel 1 – Increases attack power. Also improves Affinity at higher levels
- Elementless Jewel 2 – Powers up non-elemental weapons you have equipped
- Expert Jewel 1 – Increases Affinity
- Critical Jewel 2 – Increases the damage of critical hits
As you can plainly see, the Decorations used are all focused on damage, and critical hits. Nothing fancy, but just that. If you have more than one Attack Jewel, feel free to use it.
Once properly decked out, your character should have the following skills:
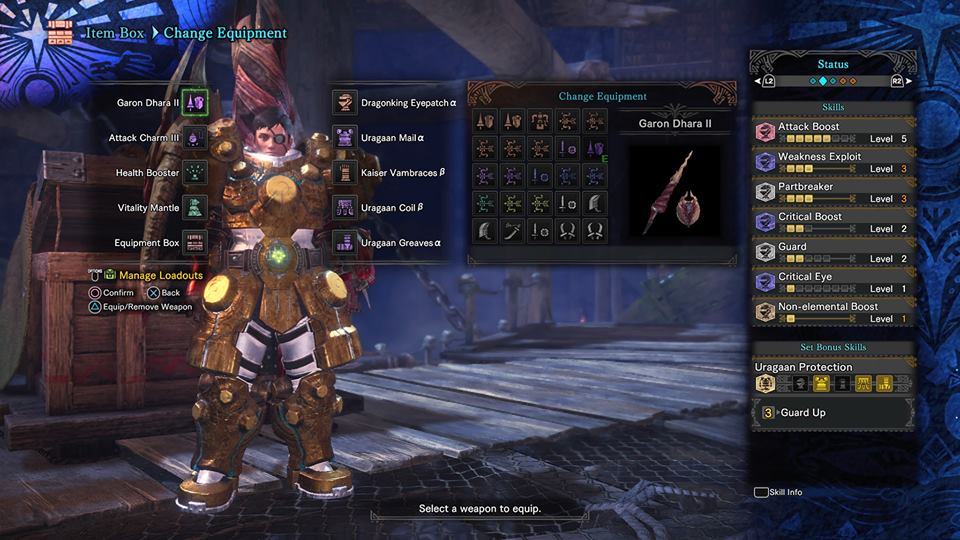
How this armor and weapon combo works and tips:
Every Decoration and armor piece all help in increasing your attack and critical damage. Couple this with the “Partbreaker” skill (all maxed out), and you’ll be severing tails, breaking horns and more in no time.
This build is focused on just guarding (holding R2) everything that comes your way. Nergigante about to dive bomb you? Just hold R2! You don’t even need to do a powerguard to survive it! Just hold R2 (make sure you have enough stamina), and voila! Super easy! You can guard against Vaal Hazak’s poison laser, Teostra’s supernova and everything else. Urugaan Protection set bonus for the cheese?! Yep, and it’s delicious!
For me personally, I ended up with 48 percent affinity, which is fine enough when dealing damage (depending on where you hit, each poke usually comes out at 40-60 damage per hit, and sometimes even goes as high as 70-80+ per). Use the Affinity Booster to help you increase your damage output.
Same as with any end-game build, once you get the necessary armor pieces, make sure to upgrade them to max ASAP. And when you finally unlock augmenting, bump each armor’s defense up to max again.
Weapon augments for the Garon Dhara II should focus on attack and/or affinity. That said, some lance users swear by the health regen augments, so it’s a matter of personal preference.
With this build, I was able to tank through all the tempered Elder Dragons solo. I even did the Sapphire Star’s Guidance optional quest (the one where you had to defeat tempered Nergigante, Teostra and Kushala all in one run) solo.
If you need or want something reliable when making runs at tempered Elder Dragons or if a certain enemy is smacking you and you’re friggin’ annoyed by it, then use this build! Guard against everything, and just poke the crap out of them until they die. It’s not super exciting to watch but it’s definitely satisfying when you’re the only one who doesn’t panic when monsters unleash their ultimate attacks.