
Battlefield 6 High CPU Usage Fix Guide That Can Improve Framerates


For those playing Battlefield 6 on PC, you may have noticed some framerate issues on your build. While there are many contributing factors, several players in the community (including us) have experienced unusually high CPU usage while playing the game. Whether intended or not, there’s a fix for that, which should mean a cooler-running CPU, and even possibly improved framerates.
Here’s how you fix Battlefield 6’s high CPU usage.

Battlefield 6 High CPU Usage Fix Guide
The fix, which comes courtesy of YouTuber Minnidot, involves a few simple steps. You can follow the video guide above, but I’ve also prepared a text guide below.
First and foremost, what isn’t mentioned in the video guide above is to find your game installation and save its path somewhere. This may vary for everyone, specifically if you are using the EA App or Steam and have your games installed in a path other than the default one. I will show you how to locate the pathing for each client.

Steam – How to find where Battlefield 6 is installed:
- Open Steam, then go to the library and locate Battlefield 6.
- Right-click, select Manage, then browse local files. This will open the folder up.
- At the very top of the folder, you’ll see the path of your installation. It should look something like this: This PC/Your Drive/SteamLibrary/steamapps/common/Battlefield 6
- Keep this folder open, or copy the path by right-clicking on Battlefield 6 and selecting copy address. You can also left click on the blank space to the right of Battlefield 6 and select it all, then ctrl+c to copy, and ctrl+v to paste.
EA App – How to find where Battlefield 6 is installed:
- Open the EA App, go to the library, and locate Battlefield 6.
- The game’s art box will have two icons on it, one with a triangle in a blue box (the play button) on the bottom right, and the other a gray box with three dots on the top right. Hit the three-button box, then click View Properties.
- You’ll see the install location here. You can open the folder.
- At the very top of the folder, you’ll see the path of your installation that should be the same as the one listed by EA in the previous step.
- Keep this folder open, or copy the path by right-clicking on Battlefield 6 and selecting copy address. You can also left click on the blank space to the right of Battlefield 6 and select it all, then ctrl+c to copy, and ctrl+v to paste.
Alright, so keep the install location on hand, you’ll need it in a few.
So let’s open up Notepad (search for the app using Windows’ Search Bar if it’s on your taskbar) and paste the following:
Thread.ProcessorCount 8
Thread.MaxProcessorCount 8
Thread.MinFreeProcessorCount 0
Thread.JobThreadPriority 0
GstRender.Thread.MaxProcessorCount 16
DO NOT SAVE YET
There’s a little editing you’ll need to do here, as this info is set up for an AMD 9800x3d CPU. If you have that, great, move, we’ll get to what you need to do in a minute. For now, follow along just in case.
So the next step you want to do is open up your task manager by right-clicking on the blank space (so not on an app) on the taskbar (that bar on the bottom of your screen). A Task Manager option should be available; select that, and the taskbar will open. Select the performance menu on the left side (hit the three-bar icon to open up the navigation), then select the CPU box. Here, you want to locate the Cores and Logical Processors.
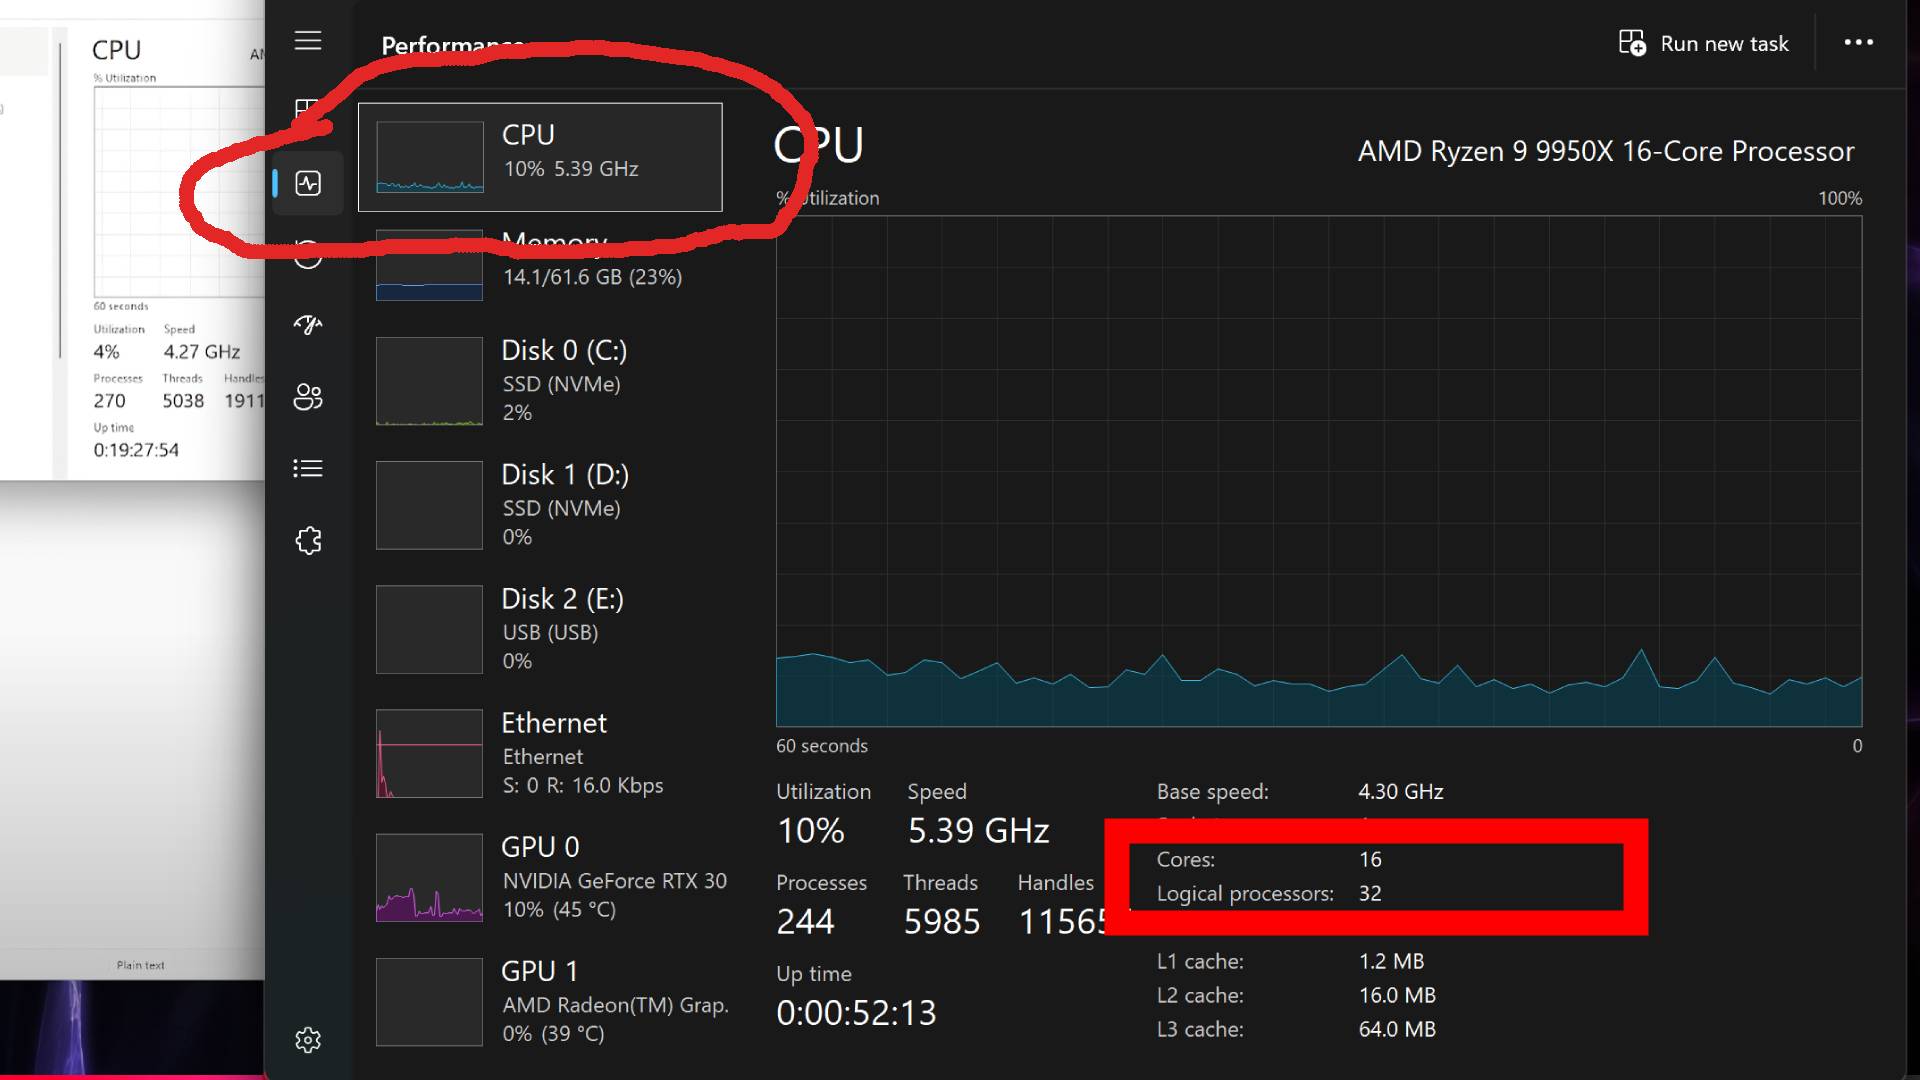
Return to the Notepad you just created and update the content based on your numbers. I am using my example above in this case. Leave the ones with 0 at the end as they will remain unchanged.
Thread.ProcessorCount 8 ——> Thread.ProcessorCount 16
Thread.MaxProcessorCount 8 ——> Thread.MaxProcessorCount 16
GstRender.Thread.MaxProcessorCount 16 ——> GstRender.Thread.MaxProcessorCount 32
Now go to the file, and select Save As. This will open a default folder. Navigate to the directory bar and copy and paste your Battlefield 6 installation address from the steps earlier. We are ready to save, all we need to do is name the file User.cfg and make sure the save as type says “All Files.”
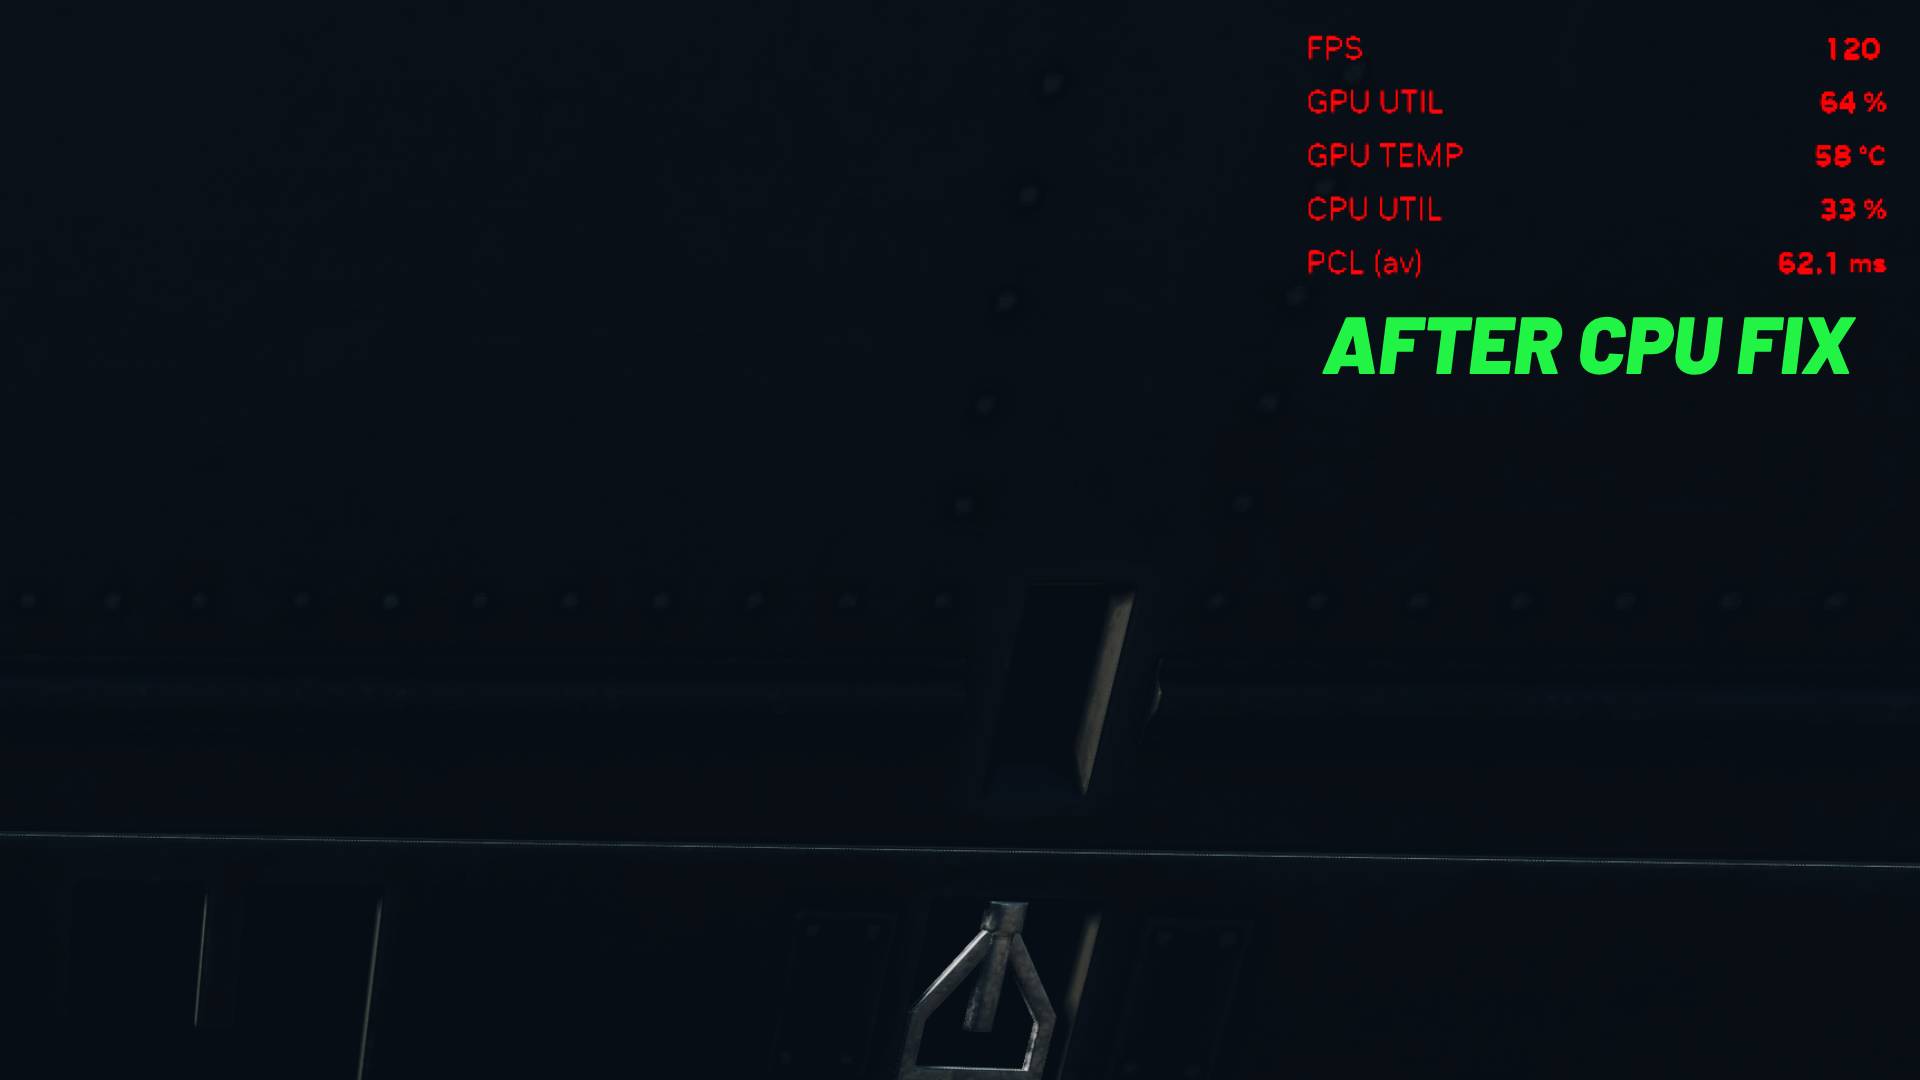
That’s it; you should now be able to launch Battlefield 6 and notice the CPU usage is no longer extremely high. In my case, I went from averaging around 55-60% in-game with peaks of 70-80% to now averaging 30% with peaks of 50%. My general framerate now seems to hold up a lot better, too, with significantly less stuttering, if not completely free.
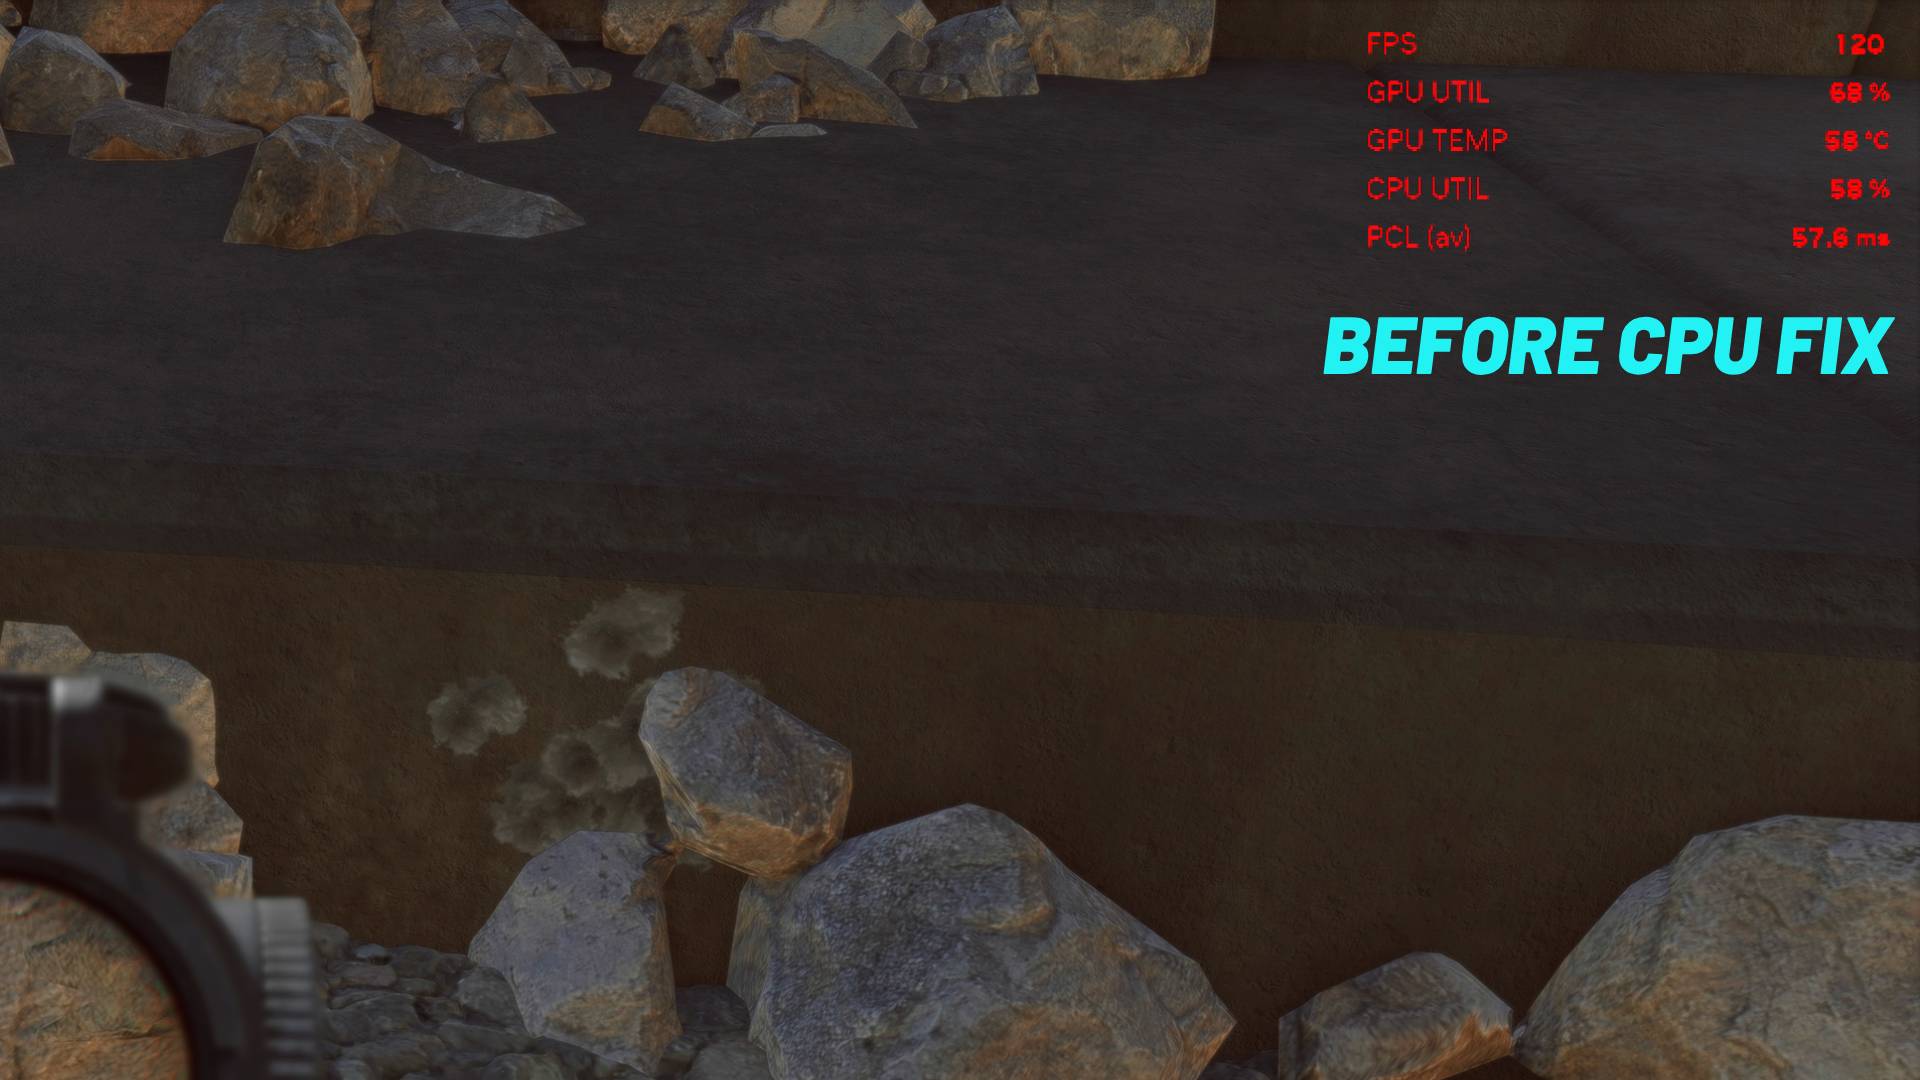
Not only does this improve performance in some cases, but it also means that your CPU temps won’t get as hot when pushed to high loads for so long.
Oddly, this was an issue not only during the Battlefield 6 open beta but also in Battlefield 2042, meaning it’s been an issue for a long while. Hopefully, Battlefield Studios will release a more widespread fix, as not everyone will be aware of this issue.
Be sure to check out our Battlefield 6 best settings guide for PC and consoles, especially now that this fix has been applied.

Stay connected to MP1st and the latest news by following us on Bluesky, X, Facebook, TikTok, YouTube, and Google News.
Why did the response time increase on the after image? Wouldn’t you want a lower response time??
You do, but keep in mind that the number fluctuates like the others, so it won’t remain static. Meaning my ms was likely running/hovering near both values before and after. being less than 4ms in differences could be due to several reasons, but it’s within a good margin of differences, versus the CPU being a far larger drop
whoa i got 150 fps boost off this!