
Resident Evil 4 Best Settings – Controls, Display and More

Are you starting out Capcom’s Resident Evil 4 remake? Perhaps you’re wondering what control configuration and tweaks are needed in order to dispose of the Las Plagas? MP1st is here to help with our Resident Evil 4 best settings guide for both consoles and PC!
Resident Evil 4 Best Settings (General for Consoles and PC)
Audio (PS5)
If you are on PS5, the very first thing you are going to want to do if you have controller speakers muted is to navigate to the audio and make sure the speaker audio is off. By default, it’s turned on, and if you have speaker volume off, you won’t hear any of the in-game coms. Turning speaker audio off in the option will fix this, making the audio come out of your TV set or speaker.
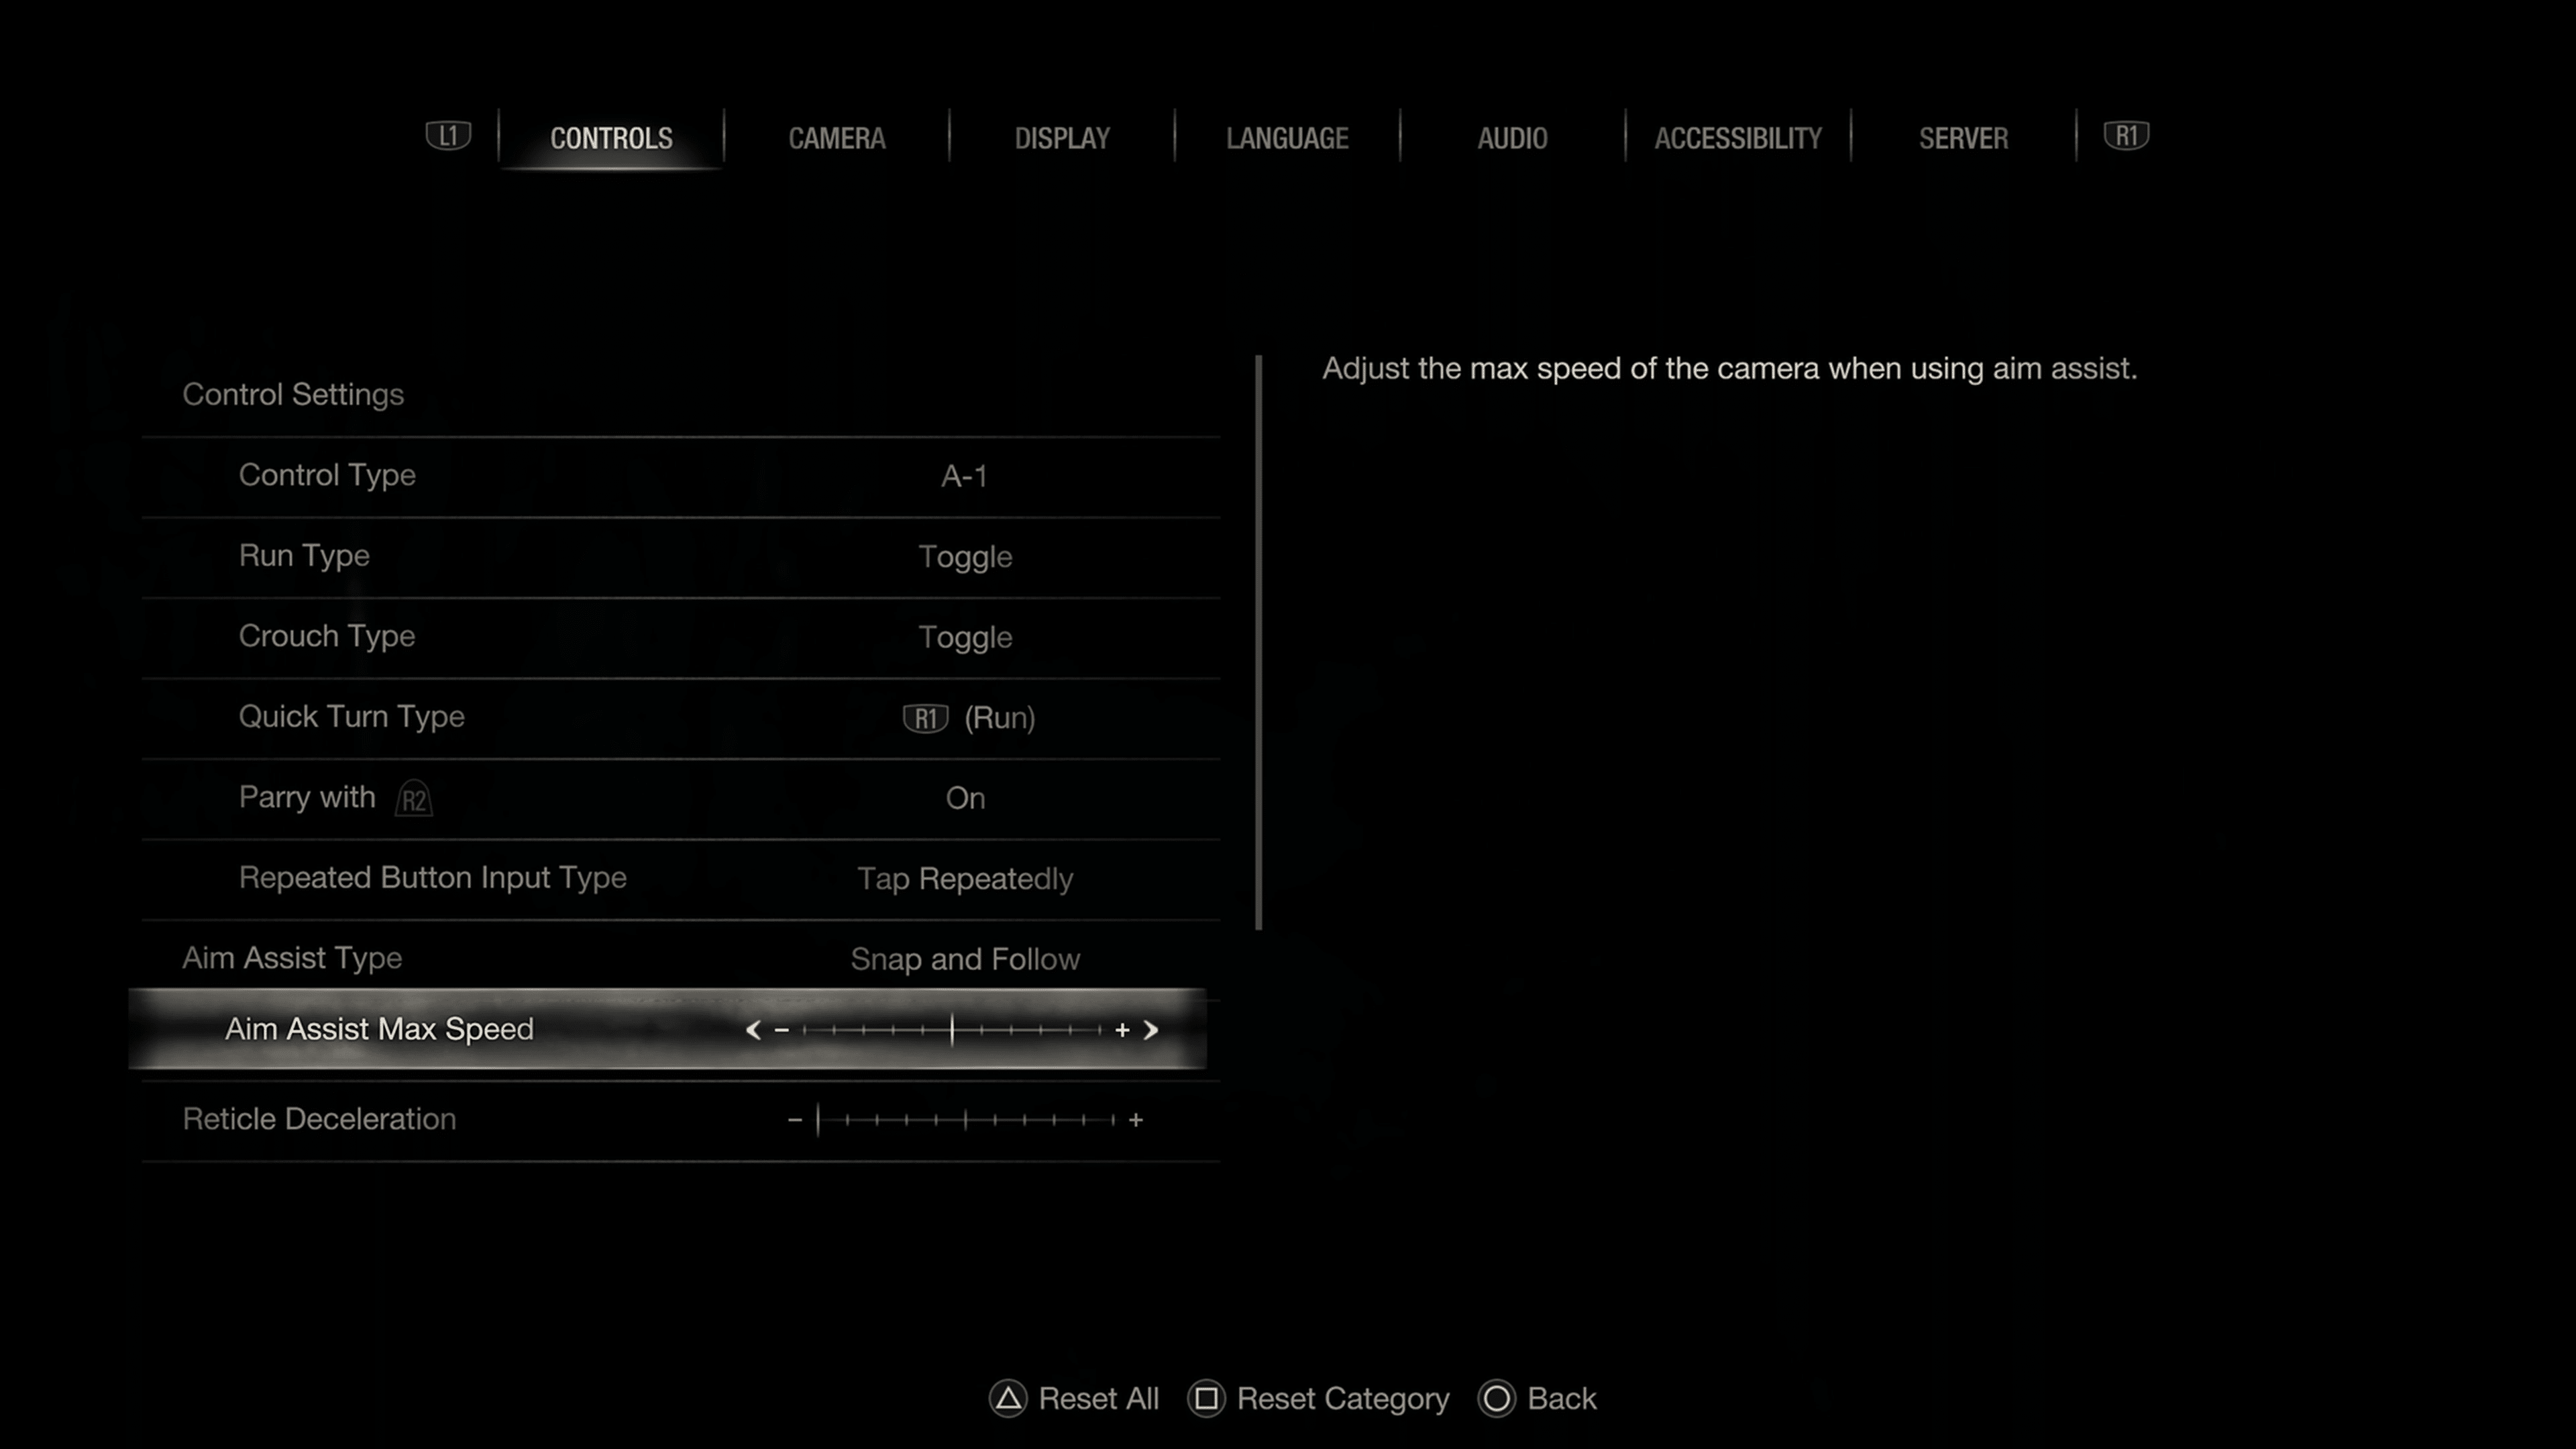
Controls
- Parry – Depending on your playstyle, you can adjust a few things to make the game “easier.” For those wanting a challenge, we recommend ensuring everything listed below is either off or set to the lowest.
- So the first thing I recommend is changing the parry action to R2 (RT). Having it tied to the same button for shooting, we found it a little easier to perform a parry than to use the default L1 (LB).
- Aim Assist – If you find it hard to aim and constantly miss shots, you may want to turn aim assist on. Two options are available here: “snap” and “snap and follow.” Snap will cause the crosshair to snap to an enemy as soon as the bottom is pressed, whereas snap and follow will perform the same action, with the aim following if the target moves. Again, if you’re looking for a challenge, make sure this option is off.
- Aim Assist Speed – This slider controls the camera’s speed when using aim assist. You can tinker around to find what best suits you, but the default value should be good enough.
- Reticle Deceleration – This slider controls how much the reticle slows down when over an enemy. Again, tinker with what you think is best, but the default should be fine.
Camera
Most of everything here is user preference, but we do recommend changing the field of view. The default value is ok, but don’t go any less as the camera may be too close to the character. Increasing it, however, will give you more viewing space and hardly has a major effect on the game’s performance on consoles.
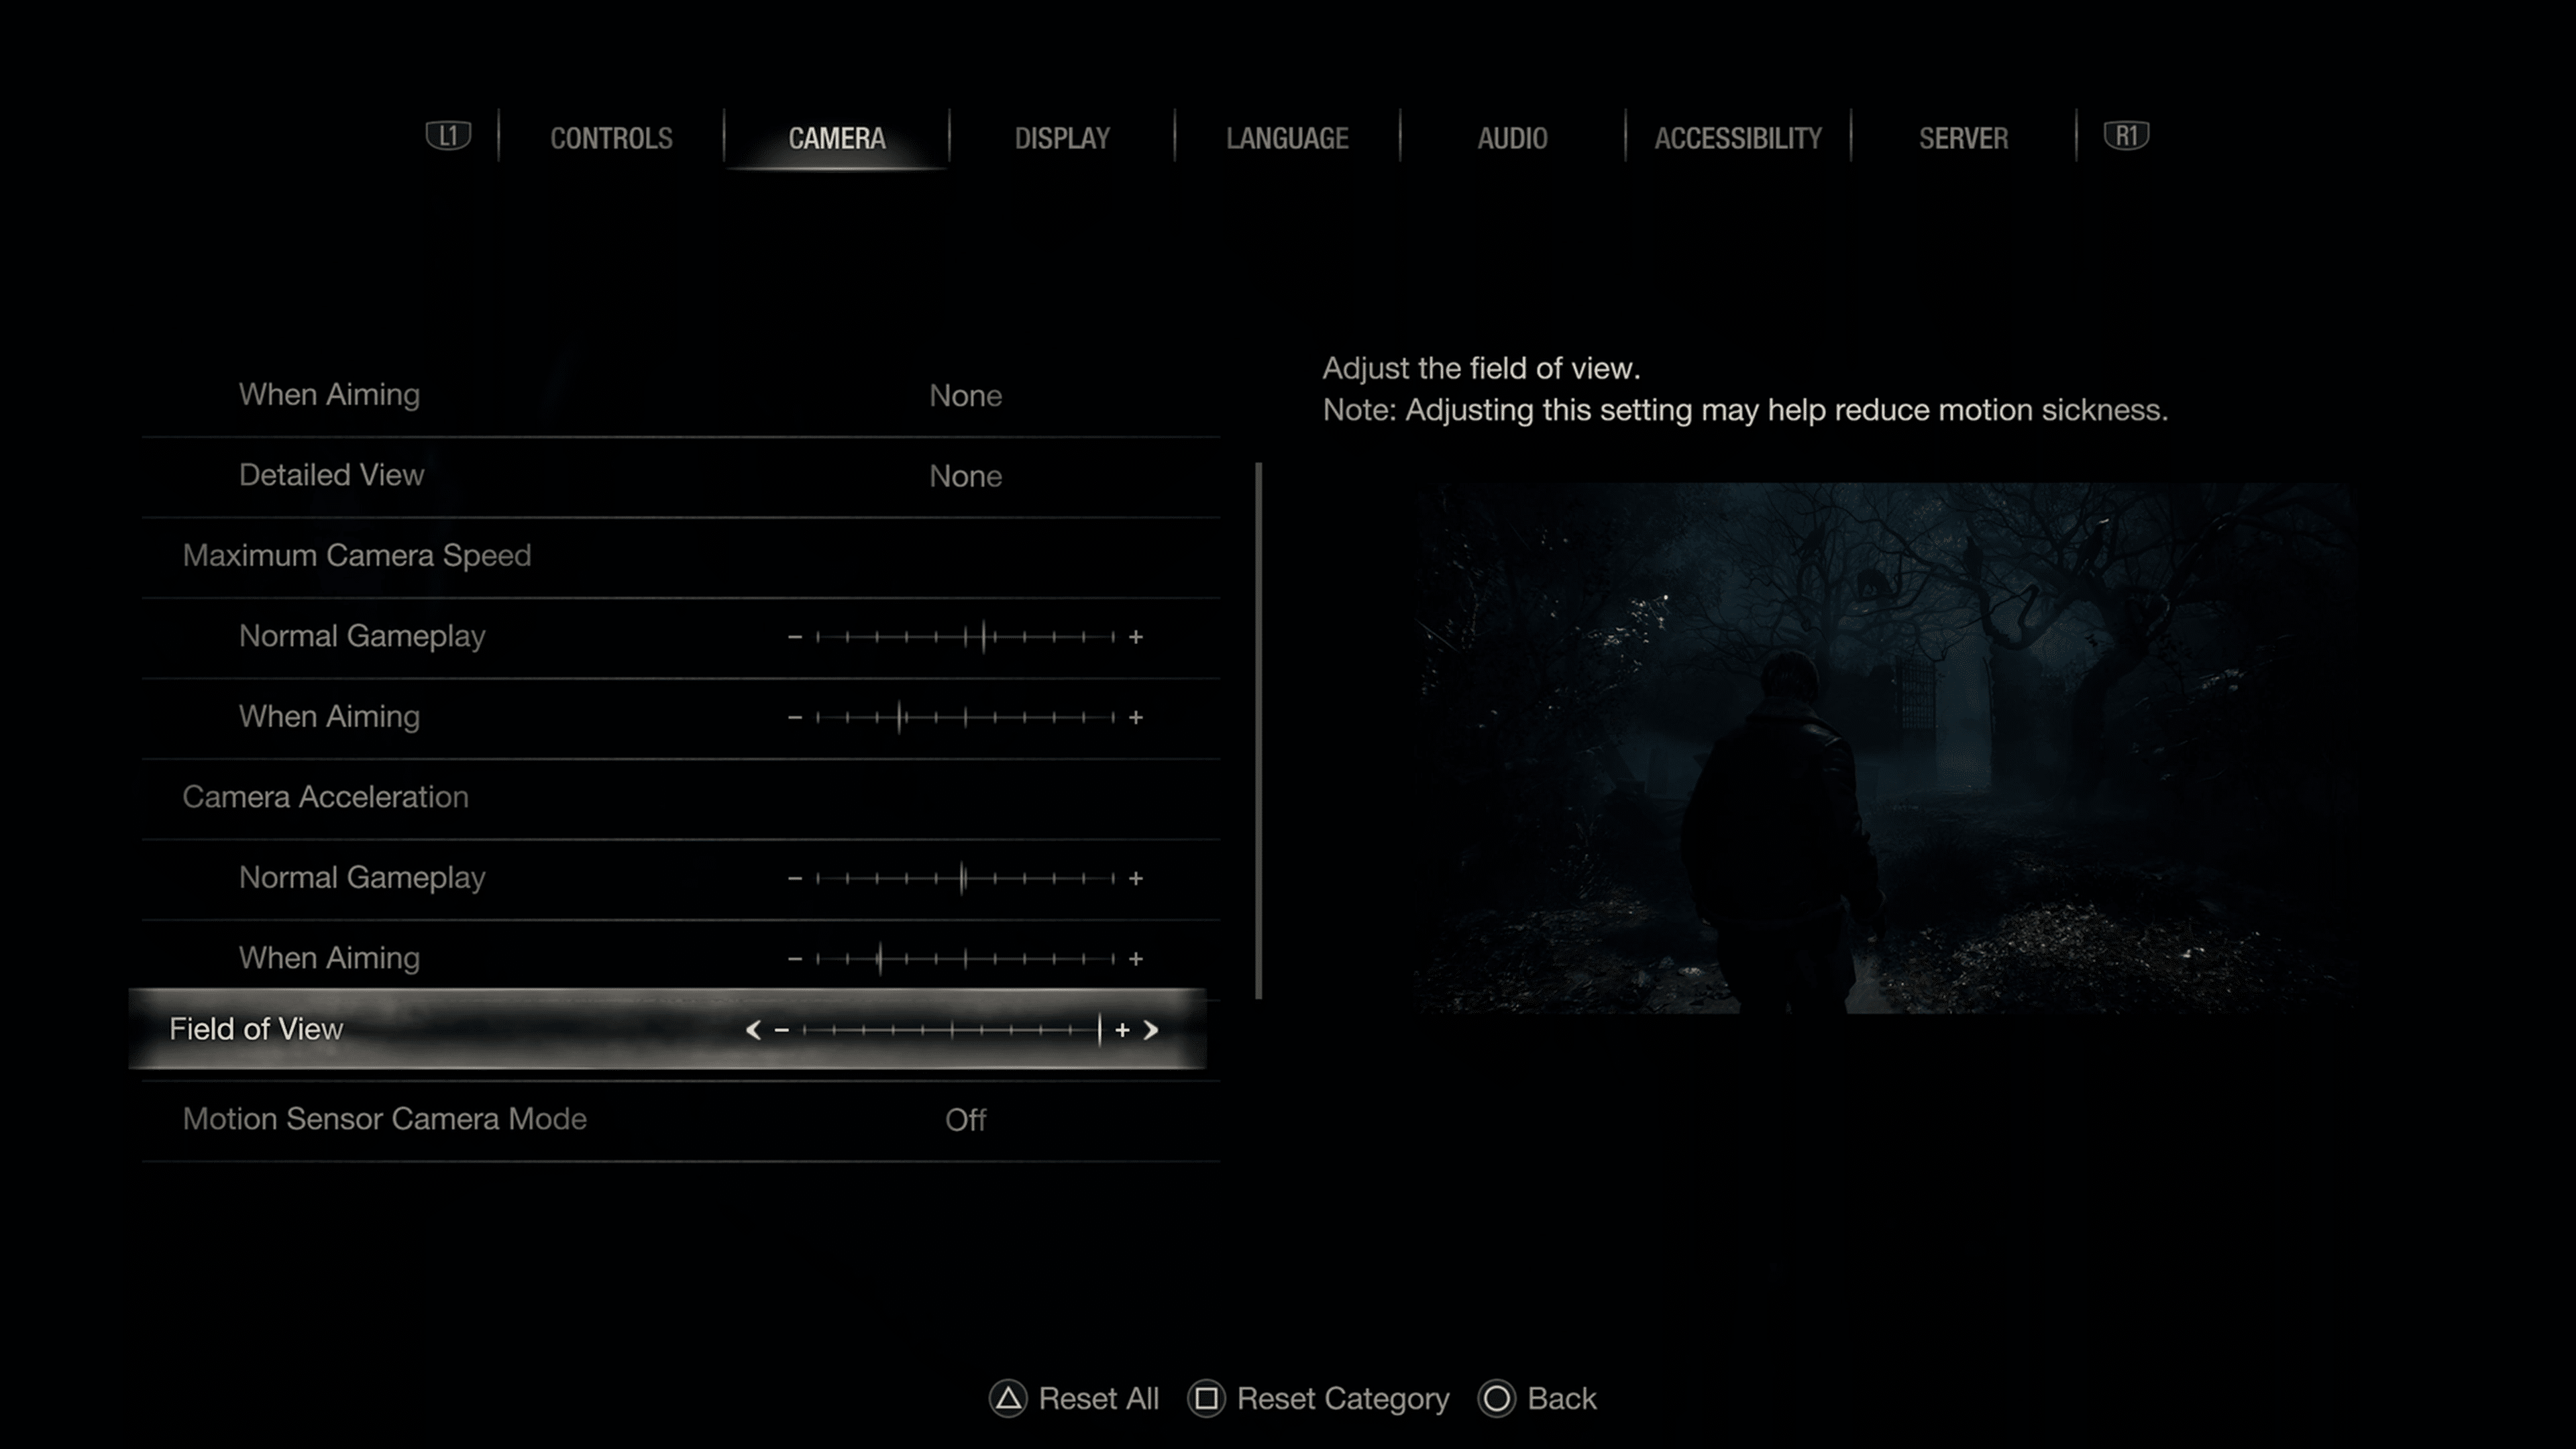
We also recommend turning motion blur off.
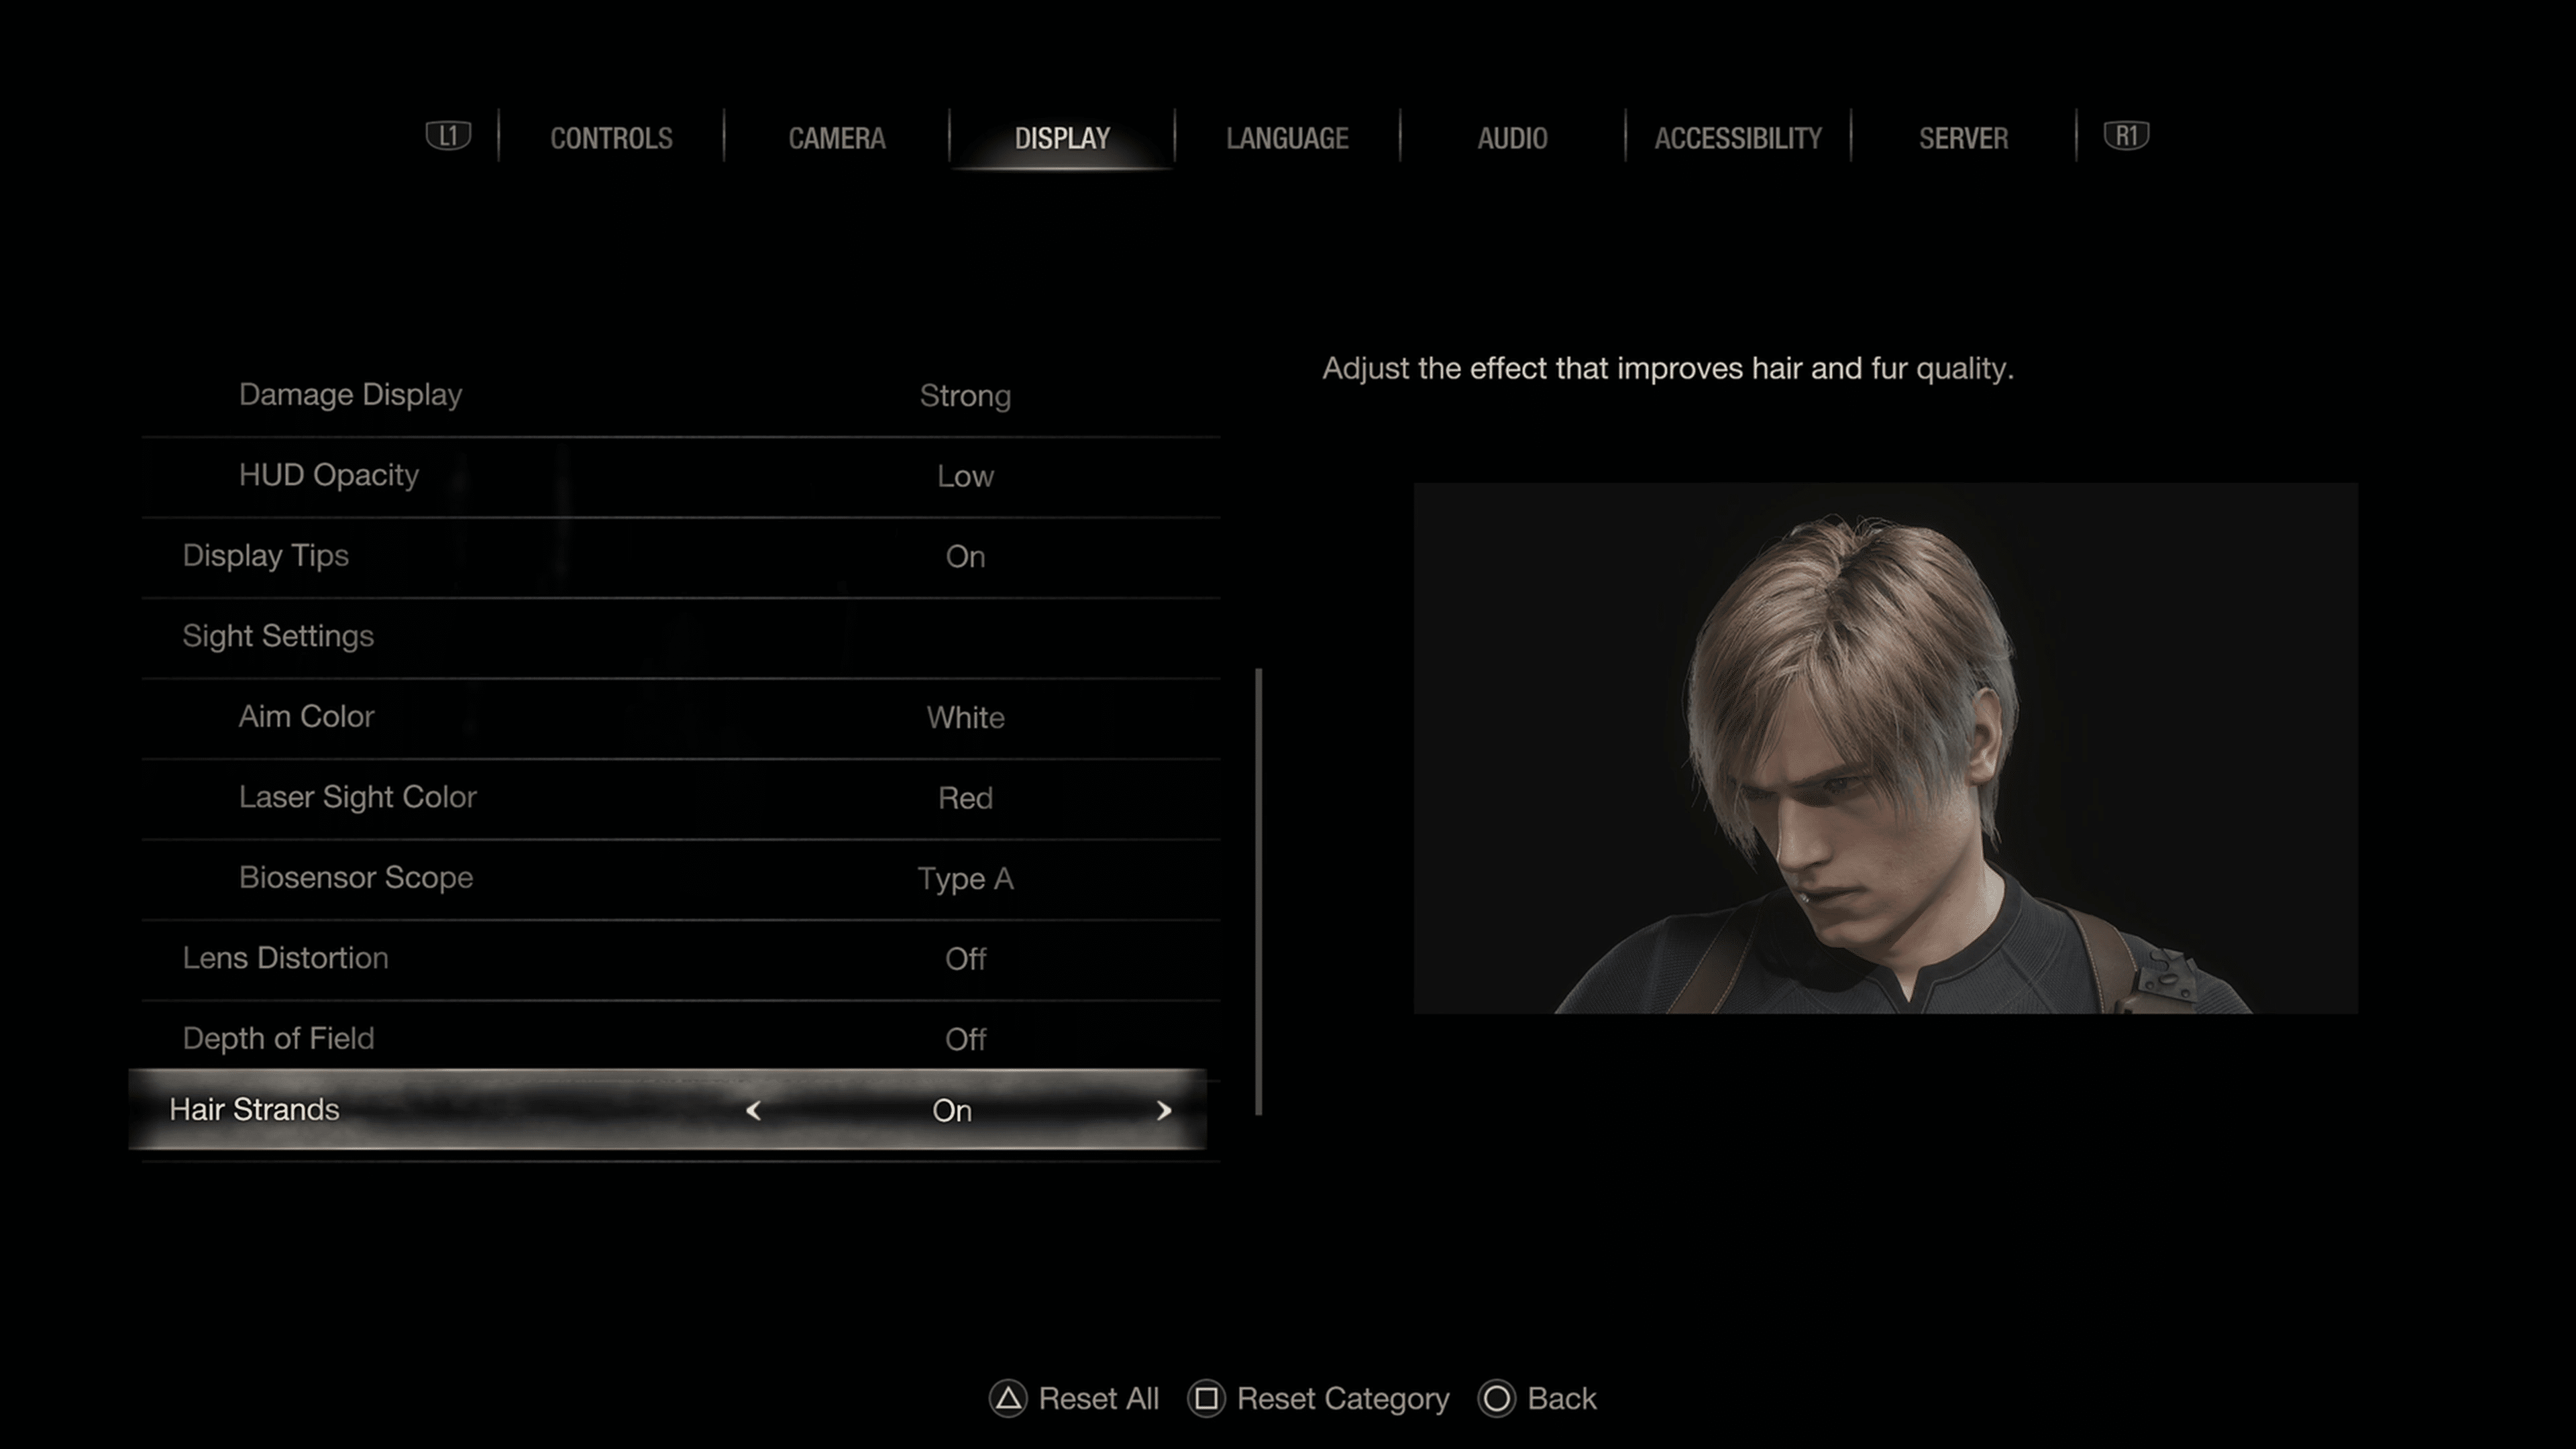
Display
- Visuals/Action Priority – Two options available here are resolution and framerate. The resolution will set the game to 30FPS with a 4K resolution target, whereas the framerate mode will decrease the resolution but offer 60FPS. We felt the framerate mode offered the better experience, though if you plan on playing with ray tracing, then you may want to opt for resolution as the impact is greater when it comes to framerate.
- Ray tracing – We only recommend using this if you plan on playing RE4 with the resolution mode preset OR if you have a VRR-supported monitor, in which case ray tracing and framerate mode is the definitive way to play.
- Brightness – Everyone likes these settings differently, though most titles have an on-screen guide to follow. This typically means adjusting a slider until an image is barely visible. That should be fine for most people, though I like having it offset a few notches.
- HUD – Keep this at default, though if you are comfortable with playing with no HUD then you can turn it off completely.
- Lens Distortion – Turn this off as it includes chromatic aberration, which seems to be causing an issue. We aren’t a fan of the fish-eye effect either.
- Depth of Field – This option controls the focus on objects depending on their distance. They appear “blurry” on screen, though that’s due to the game wanting you to focus on something specific. If you want a clean, sharp image throughout, then turn this off.
- Hair Strands – This option is a surprise since it’s typically only on PC. Basically, this will toggle better hair quality, though honestly, the default one isn’t at all bad. Having it off could help with performance, otherwise if you want better hair turn it on.
- If your PC is capable of running it, you can turn this to the highest setting.
Language
Options for subtitles are found here. User preference.
Graphics – RTX 4090 GPU (or cards that supports more than 15GB of video ram, including the 3090 and 3090Ti 24GB)
For the graphic options, we’re going to crank everything to max settings for those who have a high-end build. That means turning almost everything to max, resulting in over 13GB of video ram needing to be required. AMD 7900 series cards support 20-24GB, whereas Nvidia RTX 4000 series support 16GB and 24GB in the 4080 and 4090 cards. We don’t recommend maxing these settings out on cards with less memory than the one listed above, as that may produce performance issues.
- Diverse enemy animations – on
- Motion Blur – Off
- Rain quality – High
- Terrain – On
- Destructible environments – On
- Lens flare – On
- Lens Distortion – Personally, we prefer off, but if you do turn it on, be sure it’s not the one with chromatic aberration effect.
- Depth of field – On, but you can turn it off if you don’t like distant objects blurred out.
- Resource-intense lighting quality – High
- Resource-intense effects quality – High
- Screen resolution – Match what you use for a monitor. In our case, we have this set to 4K.
- Refresh rate – Again, match what your screen supports. Be careful going above that threshold, as you could lose input to your display.
- Framerate – Variable or Locked – If you want to really push the system, you can use variable which will go above the 120FPS thresholds. However, if you want an experience that’s going to be buttery smooth with ultra settings, set this to either 120FPS or 60FPS.
- Display Mode – Full screen
- Vertical Synchronization – On
- Cinematics resolution – 4K (cutscenes will playback in full 4K) – This doesn’t play a major impact on performance, so every card should be able to handle this if they support 4K output.
- Ray Tracing – On-High
- FidelityFX Super Resolution 1 or 2?
- Play around with both, as results may vary in overall picture quality. We do, however, recommend turning either to one of the quality presets as it will lessen the processing load. FSR2 does offer better performance and improvements overall.
- There is no DLSS support, unfortunately.
- Image quality – Keep this at 100. It goes up to 200, but even on a 4090 we found it to be too heavy that it impacted performance.
- Rendering Mode – Normal
- Anti-aliasing – FXAA+TAA
- Texture quality – High (8GB)
- Texture filtering – High (ANISO x16)
- Mesh quality – High
- Shadow quality – High
- Shadow cache – On
- Ambient occlusion – FidelityFX CACAO
- Volumetric lighting – Max
- Particle lighting quality – High
- Bloom – On
- Screen space reflection – Off (rat tracing takes care of reflections)
- Hair strands – High
- Graphic dismemberment – On
- Persistent corpses – Many
For builds that use RTX 3000 series cards, starting from the 3090, you should be able to set most things to high, though ray-tracing may need to be set to normal and possibly to screen space. 3080 builds should opt for medium to high settings.
- Refresh rate – Go based on your monitor
- Frame rate – Variable
- Display mode – Fullscreen
- Vertical synchronization – On
- Cinematics resolution – 4K
- Ray tracing – Medium
- FidelityFX Super Resolution 2 – Any of the quality modes
- FidelityFX Super Resolution 1 –Any of the quality modes.
- Image quality – 100%
- Rendering mode – Normal
- Anti-aliasing – FXAA+TAA
- Texture quality – High (1 GB) or High (4GB)
- Texture filtering – High (ANISO x16)
- Mesh quality – Max
- Shadow quality – Max
- Shadow cache – On
- Contact shadows – On
- Ambient occlusion – FidelityFX CACAO
- Volumetric lighting – Max
- Particle lighting quality: High
- Bloom – On
- Screen space reflections – On if you aren’t using ray tracing
- Subsurface scattering – On
- Hair strands – Normal
- Graphic dismemberment: On
- Persistent corpses: Many
- Corpse physics – Low
- Diverse enemy animations – On
- Motion blur – Off
- Rain quality: High
- Terrain: On
- Destructible environments – On
- Lens flare: On
- Lens distortion: Off
- Depth of field: On
- Resource-intense lighting quality: High
- Resource-intense effects quality: High
For lower-end cards, we recommend aiming for medium, and if you have to, set some things to low.
That’s about it! Don’t forget, Resident Evil 4 is getting The Mercenaries as a free DLC this April 7! Stay tuned to more Resident Evil 4 guides here on MP1st.
Stay connected to MP1st and the latest news by following us on Bluesky, X, Facebook, TikTok, YouTube, and Google News.