
Monster Hunter World Bow End Game Build Guide – What Armor, Weapons and Decorations to Use

I’ve been pouring in the man hours into Monster Hunter World, and mostly as a bow user. My Hunter Rank is sitting at HR70+ as I write this, and so far so good, the bow build I use for the end- game is good enough for me to solo most tempered Elder Dragons, though you still need to play conservatively, and intelligently to do so.
But before we dive in, here’s a quick tutorial on how to properly use the bow.
Why the bow and how do I use it?
The bow might be the most versatile weapon in Monster Hunter World. You can do well in groups, or even take out monsters solo due to your increased mobility and ranged attacks.
Important to note that for bows, your main attack won’t be to hold the L2 (or LT) button and waiting for it to max out before releasing; no. Your main attack is holding L2, hitting the R3 three times and then O. This will mean you’re attacking one light attack, charged bow attack, max charged bow attack, max charged (spread) power shot. You can add another O at the end of the spread shot to add a rain of metal balls, but you usually won’t be able to pull the entire combo off against Elder Dragons unless it’s preoccupied by someone else attacking it.
Another move you’ll use is the charged sidestep, which is performed by holding L2 and then X to dodge in whichever direction you want. Doing this move will eat up a lot of stamina, but will also mean you’ll instantly have a level three charged shot ready to go.
This simple combo, and dash move, nets a ton of damage and in quick succession, which means for DPS (damage per second), you’ll most likely be second to none given you’ll be firing off nonstop. What’s that? You can’t fire nonstop? Well, here that’s where this Monster Hunter World bow guide comes into play.
Another tip: while the bow is simple to use, there’s a lot of hidden depth to it. Chief among the hidden, unexplained ways to use it? If you press and hold L2 (LT), and see the circle within the circle, that means you’re in the optimal range for the bow, and this is where it will do the most damage (as shown by a tiny screen shake when your attacks register).
Lastly, you can perform the powerful Dragon Piercer by pressing triangle and circle at the same time when the weapon is equipped. Make sure to aim it at the head’s tip or tail passing through to the other side vertically, and not horizontally. The DP works by hitting end to end, so you’ll net a ton more damage this way. It has a long windup though, so best to use it intelligently lest you want to get mauled or severely damaged by tempered Elder Dragons.
End-game bow armor goals
Here’s the pieces I use and why:
- Headgear: Dragonking Eye Patch – Weakness Exploit Level 2
- Chest piece: Nergigante B – Stamina Surge Level 2, Attack Boost Level 1
- Bracers: Teostra B – Weakness Exploit Level 1
- Coil: Nergigante A – Attack Boost Level 2, Stamina Surge Level 1
- Legs/Grieves: Black Diablos B or Dober B – Normal Shots or Attack Boost Level 2
- Fitness Charm III – Reduces stamina depletion when performing stamina-draining moves such as evading, etc.
End-game weapon choices
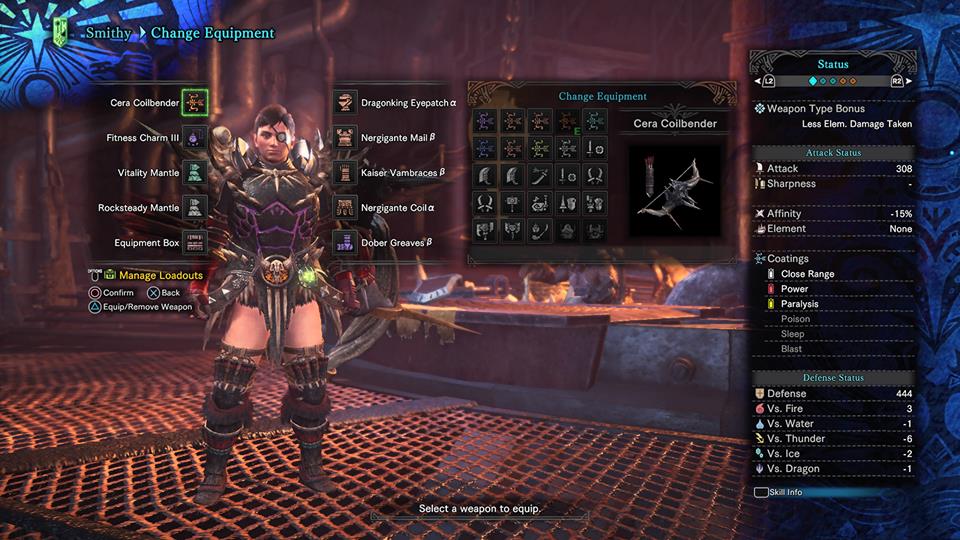
- Cera Coilbender (rarity 8)
- Doom’s Shaft (rarity 8)
Note: feel free to create elemental bows which you can use in different situations. For me, I have the Legia Snowfletcher (rarity 8) for the tempered Elder Dragon Teostra, and Flying Kadachi Strikebow (rarity 8) for tempered Nergigante and so on.
End-game Decorations needed/need to farm
- Attack Jewel 1 – Increases attack power. Also improves Affinity at higher levels
- Elementless Jewel 2 – Powers up non-elemental weapons you have equipped
- Pierce Jewel 3 – Increases the attack power of piercing ammo and Dragon Piercer
- Expert Jewel 1 – Increases Affinity
- Forceshot Jewel 3 – Increases the attack power of normal ammo and normal arrows
- Mighty Bow – Adds another charge level to bows (max charge is given an extra shot)
- Spread Up – Power shots do increased damage
For Decorations, these are RNG-based drops, so you’ll need to be lucky to get the higher-level ones. If you’re not past HR50 yet, I strongly recommend you reach or go past HR50 before you start mining for Decorations, as the quality of the drops (even though they’re random) significantly go up.
The Forceshot Jewel 3 should be used in case you’re rocking the Dober B Greaves for the added attack boost, but if you’re using the Diablo B Greaves, feel free to sub Forceshot out for an extra attack Decoration (if you can manage to farm or meld one), or something else.
How this armor and weapon combo works and tips
As you can see, this build focuses on the following skills: Attack Boost, Weakness Exploit, Constitution, and Stamina Surge. There are other skills in play, but these four are the main skills you’ll rely on to slay tempered monsters.
With these skills, you should be able to weave in and out with charged dashes (L1 + X in any direction) with insane frequency, which means charged level three shots with your bow are at the ready.
You won’t be relying on coatings which is a pain in the ass to constantly restock, etc. Sure you can use them whenever you want, but with this build you can use the close range coating and the regular arrows and see tremendous results. You won’t feel shackled by having the need to constantly craft new coatings.
One of the key (underrated) items in this build is the Fitness Charm III, which gives you Constitution level 3. It might be tempting to use an Attack Charm III, but believe me when I say this: Stamina wins out in terms of pure DPS dole out, and when you factor in you do more evades, it’s a no-brainer to use.
You’ll most likely should be rocking the Cera Coilbender since it has the highest raw damage output for bows, and give it’s non-elemental, the Elementless Decoration bumps that number even more as well. You can offset the negative Affinity of the Coilbender with the Affinity booster; even without it, it’s a mighty weapon that you can use for all situations.
Once you get the necessary armor pieces, make sure to upgrade them to max ASAP. And when you finally unlock augmenting, bump each armor’s defense up to max again.
Weapon augments should focus on Affinity instead of increasing attack power, as the added increase in Affinity damage is boosted a lot with the Weakness Exploit, etc. boosts this build has.
This Monster Hunter World bow build is something that can usually be used in every situation, every enemy type and so on.
Well, there you have it! This is one heck of a Monster Hunter World end-game bow build that I’m sure will give you as much success as it has for me. Credit goes to Reddit user timy_pelling_errors for the armor combinations. Read up on more Monster Hunter World guides in the links below.
More Monster Hunter World Guides on MP1st:
- Monster Hunter World Augmenting Guide – What It Is and How to Unlock It
- Monster Hunter World Monster Weakness Chart Gives Us a Super Quick Way to Know What Elements to Use
- Monster Hunter World Jewels and Decorations – How to Get the Good Ones
Stay connected to MP1st and the latest news by following us on Bluesky, X, Facebook, TikTok, YouTube, and Google News.
Any chance for more of these type of guides for the other weapon types?
Any chance for more of these type of guides for the other weapon types?
Any chance for more of these type of guides for the other weapon types?